Shopify only supports certain web-compatible raster image formats in the admin and in the theme customizer. But you can still use an SVG for your logo, it's just not as easy.
To upload your logo to your store's theme using the theme customizer, it has to be a PNG, JPG or a GIF. The theme customizer simply doesn't let you upload other image formats (this is also true for uploading product photos, collection featured images, etc.). So, to use an SVG for your store's logo, you have to work around this limitation.
Advantages of using SVGs
It's been good practice for a while now to use SVGs for things like logos and other graphics, mainly because, since they're vector formats, they're infinitely scalable. This saves you from the mess of providing responsive images for various different window/screen sizes, resolutions and density. SVGs are typically also a lot smaller (in terms of file size) than a comparable PNG, so they're good for your store's loading speed.
The ideal application for using SVGs is your store's logo. Many, if not most, logos are made up of fairly simple objects like lines, shapes and text. This makes them ideal for using the SVG format. But how do you add an SVG logo to your theme when you can't upload it in the theme editor?
Before You Begin
Before you make any changes to your store's theme, make sure you know how to use the code editor and create a backup of the theme.
Creating a web-compatible SVG
Before we upload any old SVG to our Shopify store we need to make sure the SVG we're using will work in web browsers. Depending on the app you're using to create the SVG, just saving it as an SVG might produce a graphic that doesn't look correct once you open it in a browser.
For example, the excellent open-source vector graphics program Inkscape works with SVGs natively, meaning that it's Inkscape's default file format. Nevertheless, you can't just take an SVG created by Inkscape and put it on a website. It might even look OK on your computer, but if you test it on another computer or your smartphone, it might look anywhere from a bit off to totally borked.
One of the most important things you have to do when you save your logo as an SVG is to transform any text it might contain into paths. This is necessary because when you export the SVG with the text as actual text, that text has the font assigned to it in the SVG file's contents. The respective code in the file basically tells the web browser displaying the SVG to display that text in that particular font.
If that font is installed on the computer on which the browser is running, it's all fine and dandy and the logo will look just like it looked inside Inkscape. But if the font isn't installed – which is highly likely if you're using a font that's not installed by default on most operating systems – then the browser will not be able to display the text in that font and will instead pick some other available font that will look almost, but not quite, entirely unlike your logo's font.
So whatever app you use for creating your SVG, make sure you convert any text into paths before you export the SVG.
Another thing you need to know about SVGs is that there are different versions and features that you can "turn on and off". In the case of Inkscape, it actually uses a superset of the SVG standard to store additional information in the file that it needs to allow a user to, for example, edit text. But all this info becomes bloat when you want to have an SVG for display in a web browser. Fortunately, Inkscape lets you choose different SVG formats when you save the file and the best one for creating a web-optimized SVG is "Optimized SVG". This format only includes the data necessary for the SVG to display correctly inside a web browser, hence the file should be a bit smaller than in its standard Inkscape SVG format. You still have to convert any text to paths manually, though, that doesn't happen automatically.
If you use a different app to create your SVG be sure to check for any options when saving the SVG. Most apps should offer some kind of control over how the SVG gets generated. And after you upload the SVG to your store, test it on various different browsers and devices and make sure it displays correctly everywhere.
Creating a theme snippet for your SVG
First you need to create your SVG file as a snippet in the theme:
- Open Dawn in the code editor and under the Snippets folder click Add a new snippet.
- Name the snippet svg-logo.
- Then, on your computer, open the SVG file you want to use for your logo in a text editor (Windows Notepad, macOS TextEdit, etc.).
- Copy the entire contents of the file to your clipboard and paste it into the svg-logo snippet file in your theme.
- Save the snippet file.
Set the SVG's width and height
While you're in the code editor, check the contents of the snippet you just created and make sure the SVG's code contains the properties for height and width.
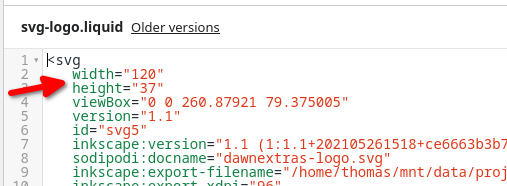
Those attributes set the actual size at which your logo will display on your store. Adjust the values as needed and make sure you maintain the image's aspect ratio (e. g. if the values are 100 by 60 and you want to reduce the size by 25 %, the new values should be 75 and 45). If those values are missing altogether, simply add them to the file as shown in the screenshot above.
Adding the SVG to the theme
Now that we have the SVG file stored as a snippet, we need to include it in the relevant theme files so it will show up in the header. In most themes (including Dawn) this means we will include it in the main layout and on the password page.
So now open the file sections/header.liquid. You should find a section of code around line 343 that should look like this:
Change that to look like this:
{%- else -%}
{%- render 'svg-logo' -%}
{% comment %}{{ shop.name }}{% endcomment %}
{%- endif -%}
This will make it so that when you don't have a JPG, PNG or GIF image set in the theme editor it will pull in the SVG logo contained in the svg-logo snippet.
Adding the SVG to the password page
If you also want to have the SVG logo on the password page, you need to make the same modification to the file sections/main-password-header.liquid. The code looks similar to the code in the main layout, after the modification it should look like this:
![]()
Conclusion
Now that your Shopify store sports a nifty SVG logo, you can legitimately consider yourself one of the cool kids. Maybe Shopify will one day get with the program and let us upload SVGs through the theme editor. When that day comes, you can proudly tell people how far ahead of the curve you were.
Have any questions? Found a bug in this tutorial's code? Leave a comment below!